About
Thank you for using Recipe Maker! This app lets you easily add beautiful recipes to your Wix website.
This guide will take you through how to install and use the app. Please read all sections carefully. Prefer to watch the full video guide instead? We got you covered!
We also have a quickstart video that is the absolute fastest way to get the app up and running. Check it out here.
On any screenshots, look out for the bright red highlights to show you which part of the page is being referred to.
Jump to section:
1. Installation
1.1 How to Install
To install the app, you must first visit the Wix App Market.
Here, you can search for the Recipe Maker app. Here's what it looks like:
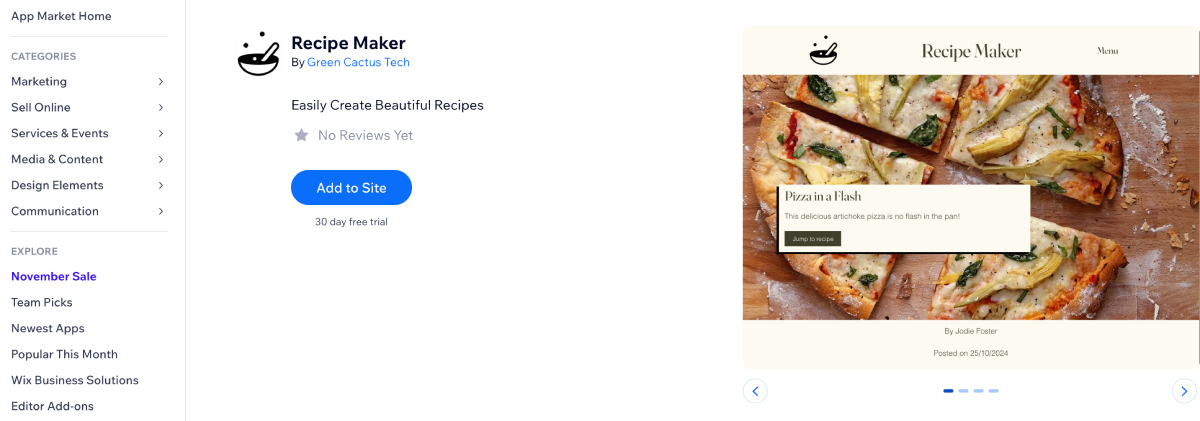
You can then click on Add to Site, at which point you will be asked which site you want to install it on (if you own multiple sites). Congratulations, the app is now installed!
1.2 Free Trial & Payment
Recipe Maker comes with a 30-day free trial, so you can evaluate the app before you have to pay anything. To activate the free trial, log into your Wix website and go to the Dashboard for your site. The below image shows the Dashboard, as well as where you go to start your trial (notice the red highlights):
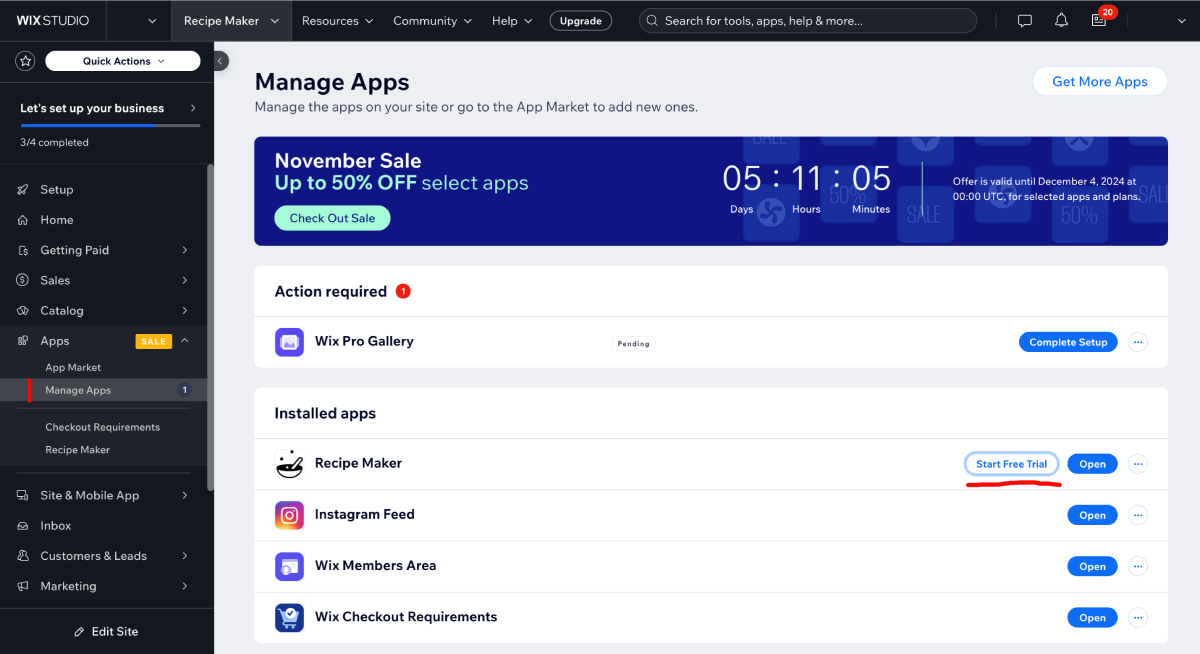
As part of enabling the free trial, you will be asked to confirm your payment information; at this stage no payment will be taken. You are then able to try the app for free for 30 days - at the end of this 30-day period payment will be taken automatically by Wix.
If you are not satisfied with the app, you can immediately cancel the free trial at any point on your Wix subscriptions page. Note that you will only receive one free trial per Wix account.
2. Initial Setup
Now you have installed the app, we're going to run through how to use it. Look out for the red highlights on any images in this guide.
2.1 Adding Recipe Maker to a Page
The first thing to do is to add Recipe Maker to a page (and of course, you can have Recipe Maker installed on as many pages as you like).
So, in the Wix page editor, open any page on your Wix site and create a new Section. If you already have a Section on your page, add a new Section underneath.
To add a Section, you usually go to the bottom of another Section, and when you hover over it with your mouse you see the '+ Add Section' pop up. Please see the following screenshot of this popup:

When you add a section, you'll be able to choose either Designed Section or Add Elements. At this stage, we recommend you to use Add Elements.
Both are going to lead to the same outcome, which is where we add the App Widget to the page. The App Widget is simply the official Wix name for Recipe Maker.
The below screenshot shows you where you will see Recipe Maker / the App Widget, ready to drag onto a page:
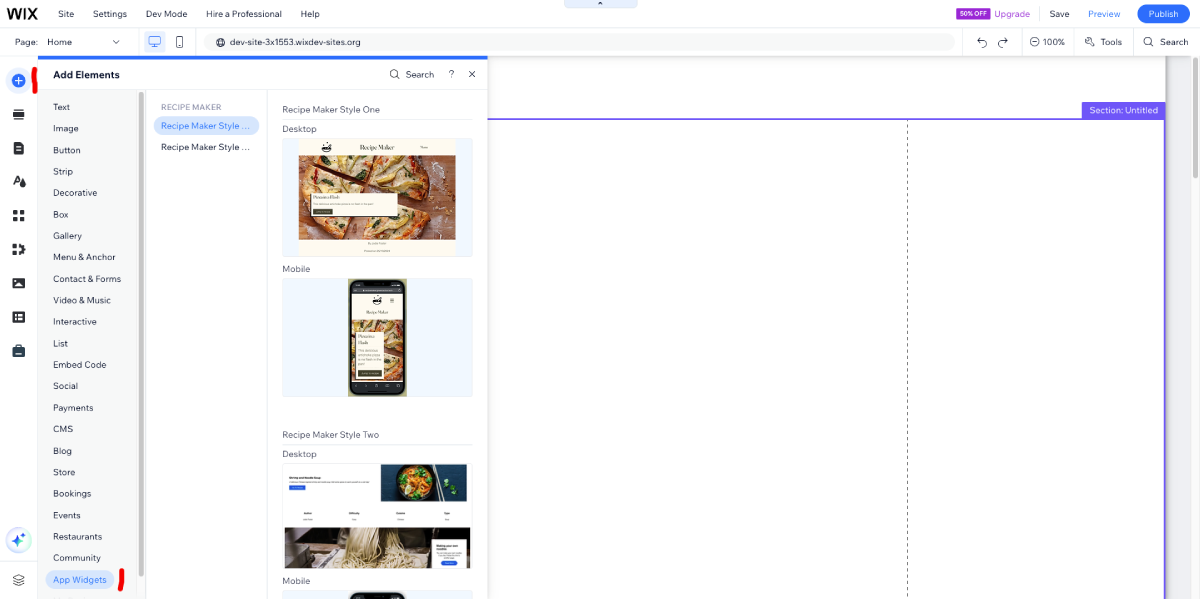
Notice that you can choose from multiple designs for your website ('Style One', 'Style Two' and so on). We are committed to adding new styles, so if you have something in mind do let us know!
Click on the Desktop icon, and Recipe Maker will be added to your page! You'll notice that the App Widget is pre-populated with a demo recipe - don't worry, you'll be able to change all this very soon!
Make sure you're happy that Recipe Maker takes up the full height of your Section, so there isn't loads of space at the bottom of the recipe.
2.2 How to Bring Up the Recipe Maker Controls
One really important thing to know is how to find the controls for Recipe Maker. In theory, you click on Recipe Maker and the controls should just pop up - however, this is really tricky, as Wix may think that you are actually clicking on an image, some text, or something else. And if you do click on an image, some text and so on, you get the controls for these, not for Recipe Maker!
So, here's our trick to getting to the Recipe Maker controls, every time (note the red highlights in the image):
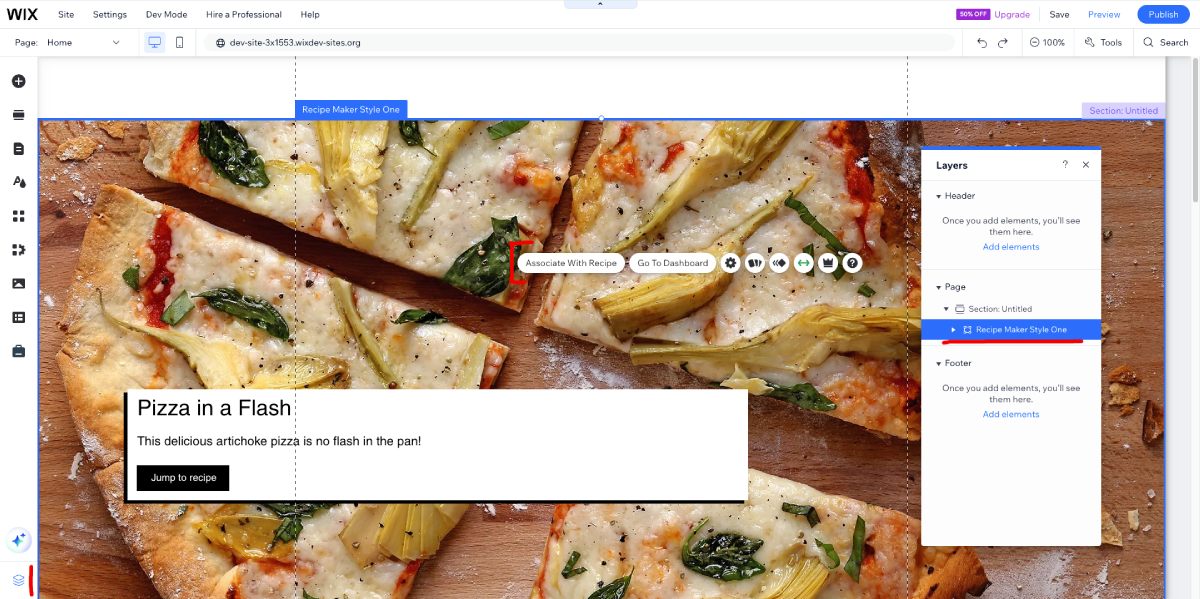
See that we have clicked on the layers icon in the bottom left corner. This brought up all layers in the popup window to the right, and you can see the Recipe Maker layer when you expand these. And from here, you click on the layer called Recipe Maker, and you'll be taken to the main Recipe Maker layer, which contains all the controls. Easy!
You'll know it has worked as you'll see the popup bar asking you to Associate With Recipe (which we'll come to later on), amongst other icons.
3. Advanced Setup
3.1 Make Recipe Maker Work on Various Displays
There's just a few more steps now until you can start adding ingredients. The first one is to decide if you want Recipe Maker to be full width. If you do want Recipe Maker to be full width, you need to click the double arrow icon (<—>) which pops up when Recipe Maker is added to a page. Here's a screenshot of this icon, so you know what to look out for:
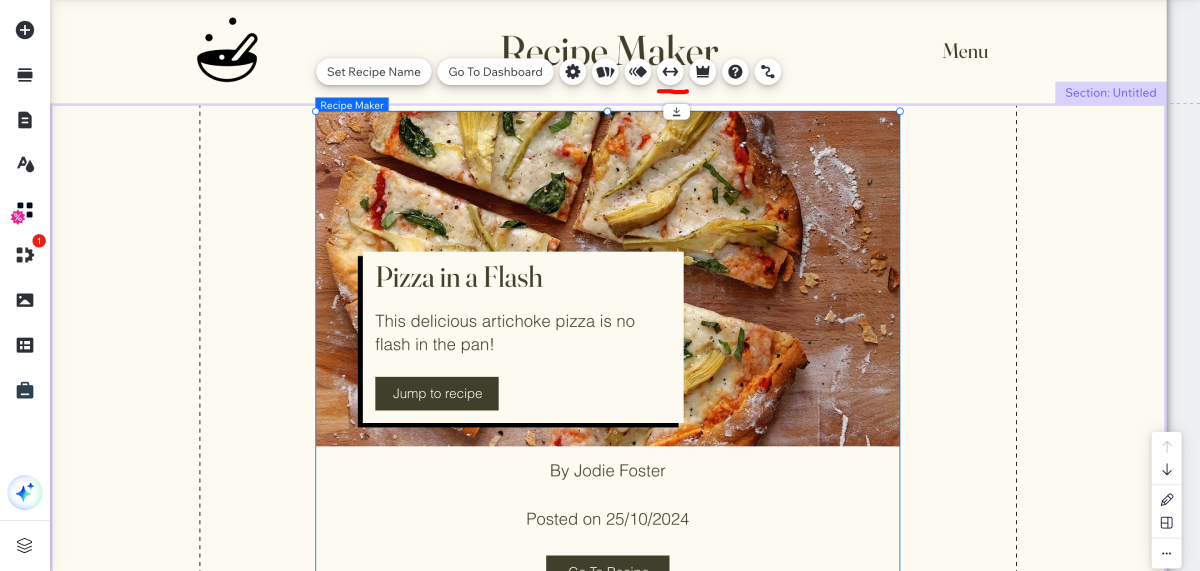
Choosing to enable full width is up to you, and you can always change it later if you like.
And the final important thing is to enable Recipe Maker on different screen sizes. This step is crucial, as without this Recipe Maker won't display very well for users who visit your website on mobile devices and tablets.
So, to do this you need to first switch into the mobile view for your page. You do this by clicking on the little mobile icon near the top of the page. Here's a screenshot of the mobile icon:

Once you are in mobile view, you'll see that the page will narrow to represent what a user on a mobile would see. From here, you need to click on the Change Preset icon. Here's a screenshot of how we found this Change Preset icon:
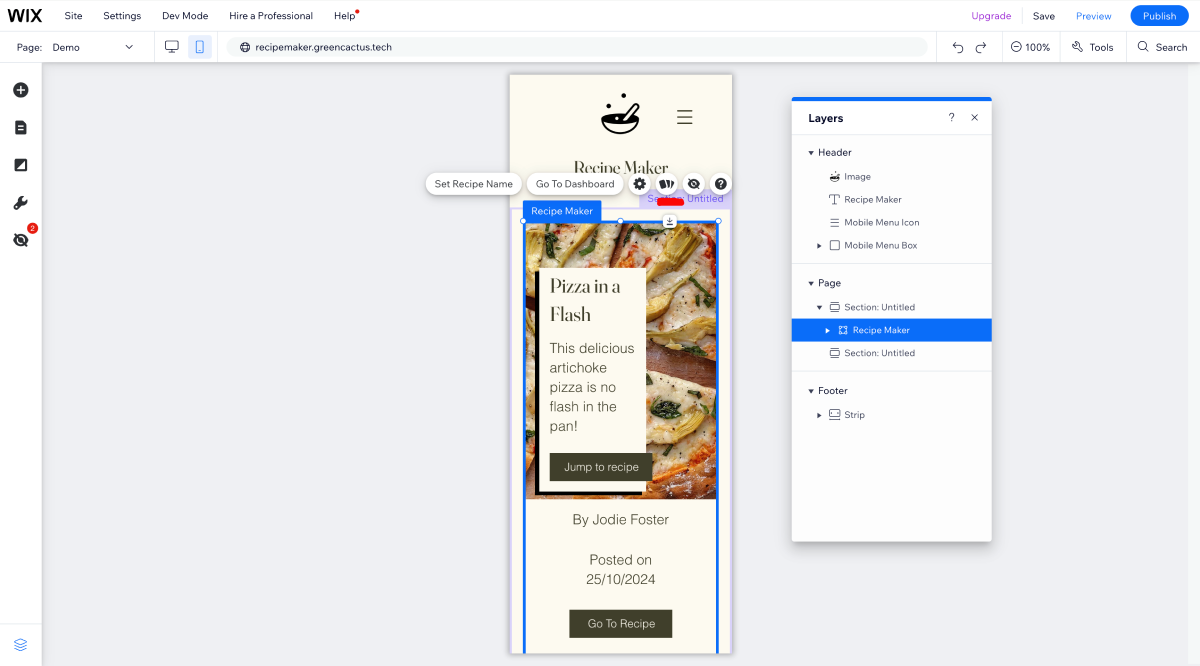
Note that we used the same trick described in 2.2 get to the Recipe Maker controls, so if you skipped that you should pop back to that section of this guide!
When you click on the Change Present icon, you are asked to choose a design. Since you're on mobile view, click on the Mobile design. Make sure that Recipe Maker is still centered, and you're done!
It's probably wise to hit Publish now, to ensure that your changes are saved.
That's everything done for the setup, now let's add some more detail to this recipe!
3.2 How to Edit Your Recipe
Editing a recipe is easy - you simply use the main Wix controls that you are familiar with to add or edit images and text. You can remove whole sections, and add or edit things as normal, which makes Recipe Maker incredibly flexible. It's just like using the normal Wix editor!
To delete a recipe, it's the same idea - simply delete the entire widget using the Wix editor.
Note that any edit or delete may take a minute or two to show to users, after you publish the page.
4. Usage
4.1 Adding a Recipe
To add a recipe, we're going to go to your site Dashboard and open up the Recipe Maker Dashboard. Here's a screenshot of where this can be found:
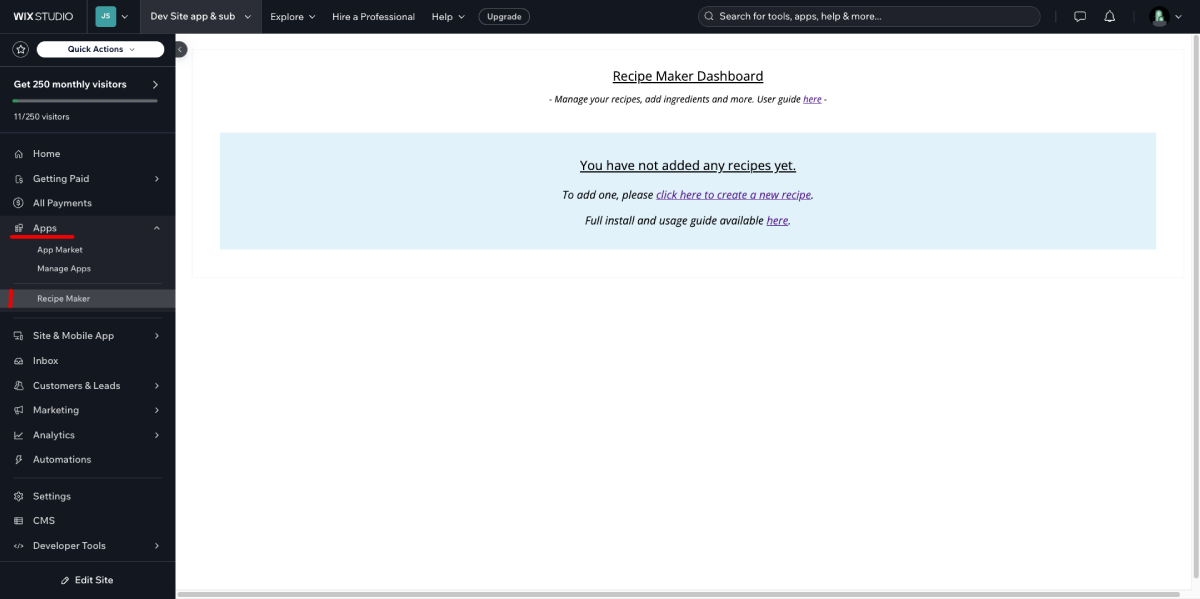
Once here, you can click on the link titled 'click here to create a new recipe'. You'll then be able to name your new recipe.
4.2 Adding Ingredients
You'll now see the name of your new recipe. You can then go into the recipe and add as many ingredients as you like, as well as set what ingredient groups these ingredients belong to (if any). You can easily change or delete any ingredients you make, so go ahead and give it a go!
4.3 Associate this Recipe with your App Widget
So, by now you have an App Widget dragged onto a page, and a recipe with ingredients that you have set up in the dashboard. But how do you associate this new recipe with the App Widget, so that the ingredients actually show? Follow on to complete this last step!
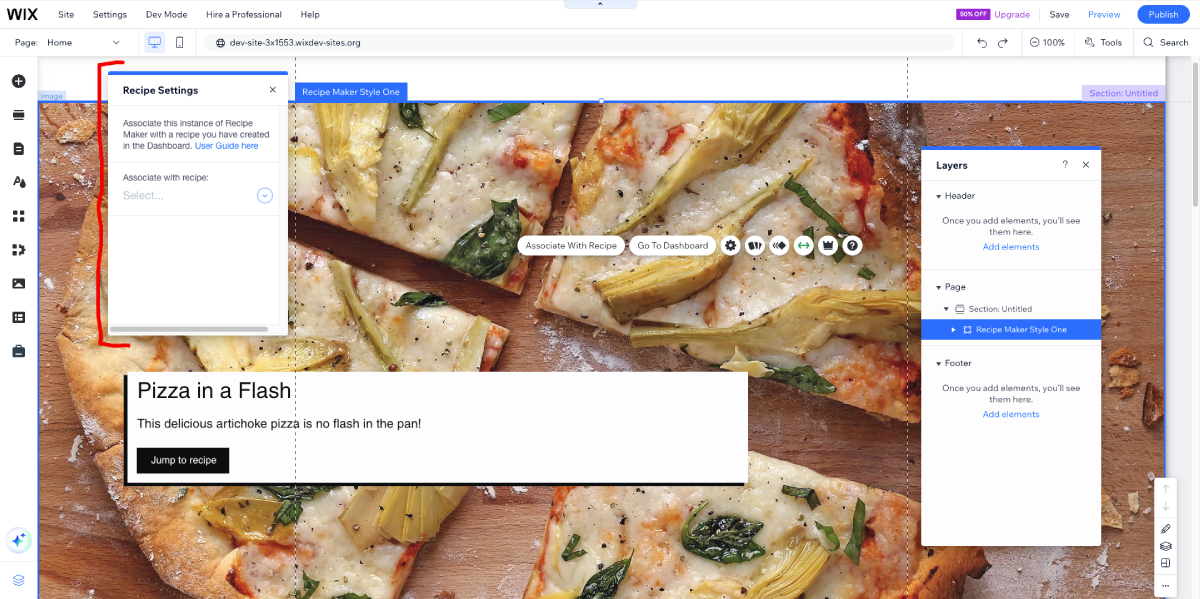
First, go back to the page that holds the App Widget. Then, following the instructions in step 2.2 to bring up the Recipe Maker controls easily, click on the 'Associate With Recipe' button that comes up. Check the screenshot below to see what we mean.
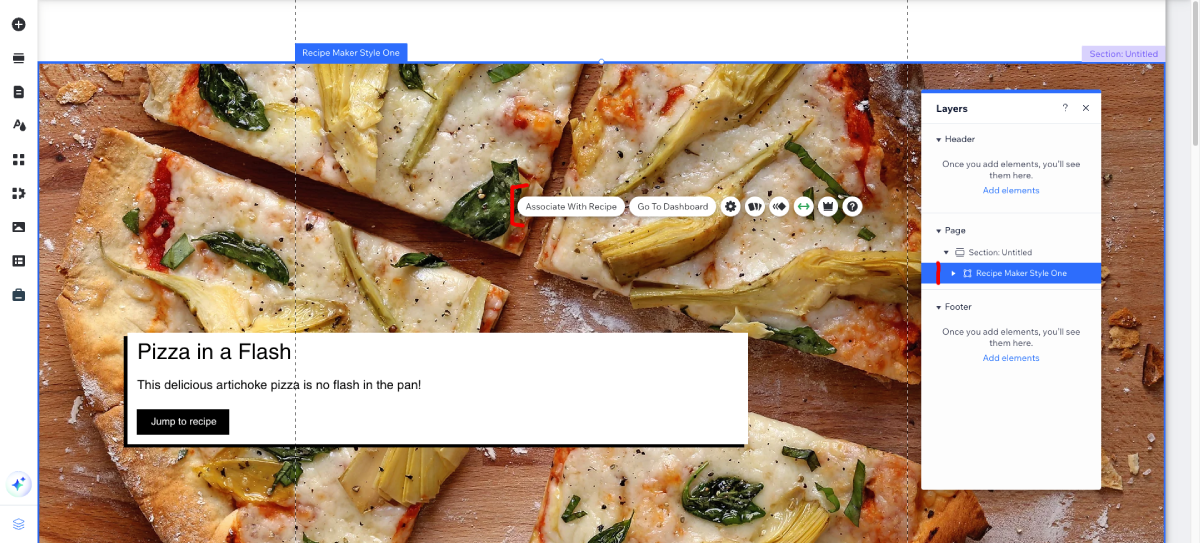
Another popup will then show, and you can select from the list of recipes that you created in your dashboard in step 4.1 above. Once you've chosen what recipe you want to associate with this App Widget (and note that a single recipe can be associated with multiple App Widgets), hit the usual Wix 'Publish' button and the changes will take place.
Note that after hitting 'Publish' these changes can take a while to appear on your live website, so please give things a few minutes at least to become available.
5. Example Flow
5.1 Example Recipe Maker Flow
Here's the example flow that shows how to quickly add a new recipe to your website, by bringing together everything we have covered above. It assumes you have already followed the steps to install the app and setup a free trial or a paid subscription.
- Drag the Recipe Maker App Widget onto a page.
- Make Recipe Maker work on various display sizes by setting the mobile design for smaller viewports.
- Alter the recipe from the demo to your own recipe using the standard Wix editor. Set all images and content etc.
- Go to the dashboard and add a new recipe.
- In the dashboard, also add ingredients for this new recipe.
- Back in the Wix editor, associate the recipe you created in the dashboard with this App Widget.
- Hit 'Publish', and you're done!
Closing Notes
We hope you found this guide useful.
Recipe Maker is an evolving and growing project. If you have ideas for new features in the app, or if you have any thoughts on this guide (or anything else!) please reach out to us at admin@greencactus.tech
Once again, thanks for using Recipe Maker!